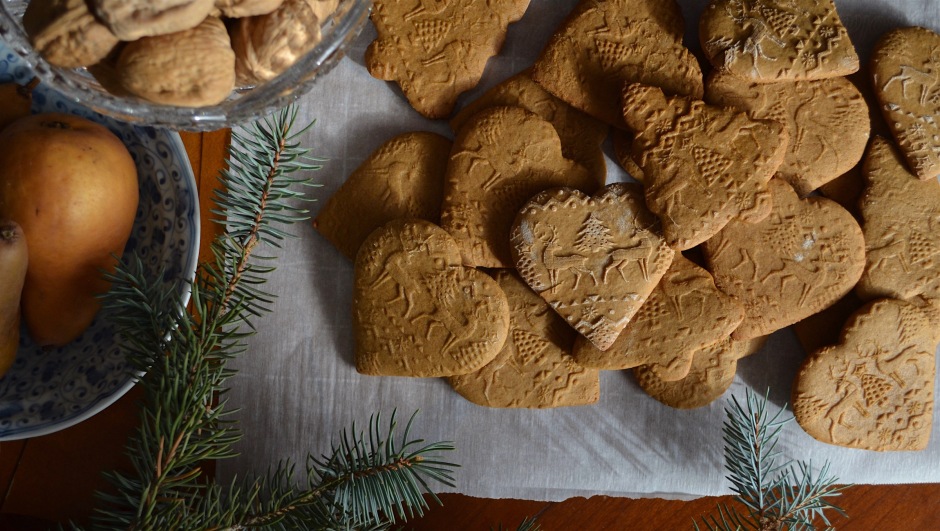
These delicately embossed gingerbread cookies are the perfect way to welcome the festive season! I’ve always loved the look of embossed rolling pins, and this one from Embossed Pin is so pretty with a whimsical forest scene that’s perfect, not just for Christmas, but all winter long. And it’s really starting to feel like winter around here. The light is different, it has an iridescent quality as if the sun is shining through shards of ice, and we’ve had three major snowstorms already. But the house has never been cozier, especially when gingerbread is baking and the kitchen is filled with the blissful scent of cinnamon, cloves and ginger. Isn’t this the most magical time of year?!
Many years ago I made cinnamon Christmas ornaments with the kids. As I was rolling out these gingerbread cookies I remembered that project. It called for an entire jar of cinnamon and a whole bottle school glue with applesauce as a binder. I was skeptical but, surprisingly, the ornaments turned out beautifully after they were baked and I attached a pretty ribbon to each one. We still use them to decorate the tree. They are welcoming and homey, and still smell just as sweet as the day we made them. I thought about how much fun it would be to make them again using this embossed pin. I’m going to have to try it this year! Not only do they make beautiful ornaments, but they would make the most unique gift tags when tied to presents (which is how I plan to use them.) Here’s a link the the original project on my old blog if you’d like to make them, too.
But back to the gingerbread cookies and this embossed rolling pin. Wouldn’t it make a fantastic gift for the baker in your life?!
I found that working with an embossing pin was a bit of a learning process – but a fun one! It took some experimenting with the types of dough and the thickness in order to get the imprint to last throughout the baking process. Here are a few tips to take some of the guess work out of it.
- Use a recipe that contains little to no leavener (baking powder or soda) and doesn’t rise or expand very much. Embossed pins work well on shortbread and gingerbread. They can also be used on fondant, or other recipes that will not be cooked, as well as for decorating non-food items such as the Christmas ornaments I mentioned above. I tried embossing a pie crust, but the butter in the dough causes too much expansion and the dough doesn’t hold the design as it bakes.
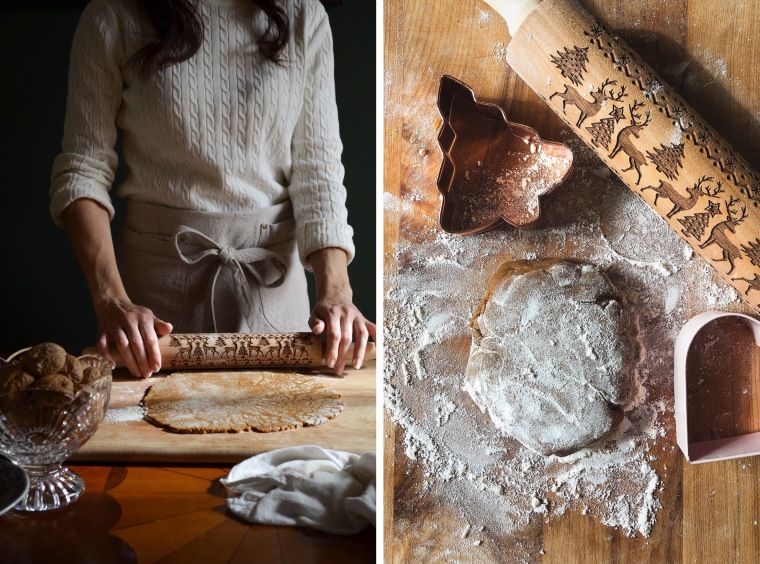
- Roll out the dough with a conventional rolling pin first. Then make on last pass using the embossed pin to create the imprint.
- When rolling out the dough, plan to use more flour than you think is necessary. The following gingerbread cookie dough is intentionally a little stickier than others because you will be incorporating so much flour into the dough as you roll it out.
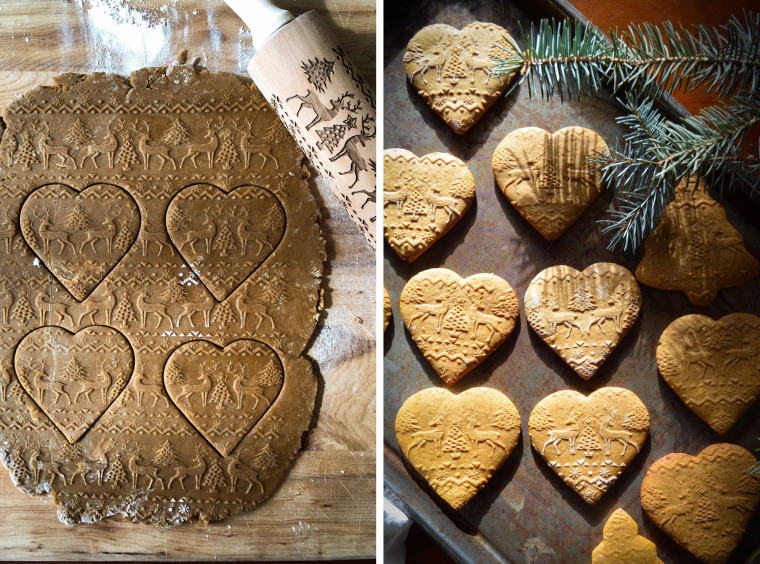
- Use the embossed pattern as a guide when cutting so that all the cookies come out with the same design. Once I got the hang of rolling out the cookies, I knew exactly where to place the cookie cutter on the pattern.
- When rolling, use more pressure than you think is necessary. I can’t stress this enough – you have to press very hard to make an imprint that is deep enough to last through the baking process.
- Thinner cookies keep the imprint better than thicker cookies, but if the dough is too thin, the embossed pin will cut through it. I rolled the dough to about 1/4 inch thick with a conventional rolling pin. After the final roll with the embossed pin, the cookie dough was about 1/8 inch thick.
- To care for the pin, wash it immediately by hand in warm, soapy water. Use a soft brush or toothpick to remove any dough that’s become stuck in the engraving. Dry with a clean kitchen towel and then rub a tiny bit of olive oil all over the pin. Store in a cool, dry place.

*This post is sponsored by Embossed Co. Check out their selection of gorgeous embossed rolling pins. Bonus – for each pin sold this holiday season, they will donate a portion of the price to organizations fighting to end hunger.
Embossed Gingerbread Cookies
(makes 2 dozen cookies)*
2 cups flour (plus more for rolling and dusting)
1/2 tsp baking powder
1/4 tsp baking soda
pinch of salt
2 tsp ground ginger
1/2 tsp ground cinnamon
1/8 tsp ground cloves
3 TBSP butter, softened
2/3 cup dark brown sugar
1 egg
1/4 cup molasses
1 tsp vanilla
1/2 tsp lemon zest
In a medium bowl, whisk together the flour, baking soda, baking powder, salt, ginger, cinnamon and cloves. Set aside.
In a large bowl, with an electric mixer, beat the sugar and the butter until fluffy. Beat in the egg. Add the molasses, vanilla and lemon zest and continue beating until everything is well combined.
With the mixer on low, slowly add the dry ingredients and mix until just combined.
Using your hands, knead the dough into a ball. Wrap in plastic wrap and let rest on the counter for at least 2 hours and up to 4 hours.
Preheat the oven to 375 F (190 C). Line two sheet pans with parchment paper.
On a generously floured surface using a standard rolling pin, roll out the dough to about 1/4 of an inch thick. To emboss the dough, place the embossed rolling pin at one end of the dough and roll slowly and firmly to the other end. Using cookie cutters, cut out cookies so that the pattern on the dough is centered within each cookie.
Use a thin spatula or “cookie lifter” to carefully transfer the cookies to the parchment-lined pans, leaving and inch or two of space between the cookies. Continue rolling and cutting the dough until you’ve used all the dough.
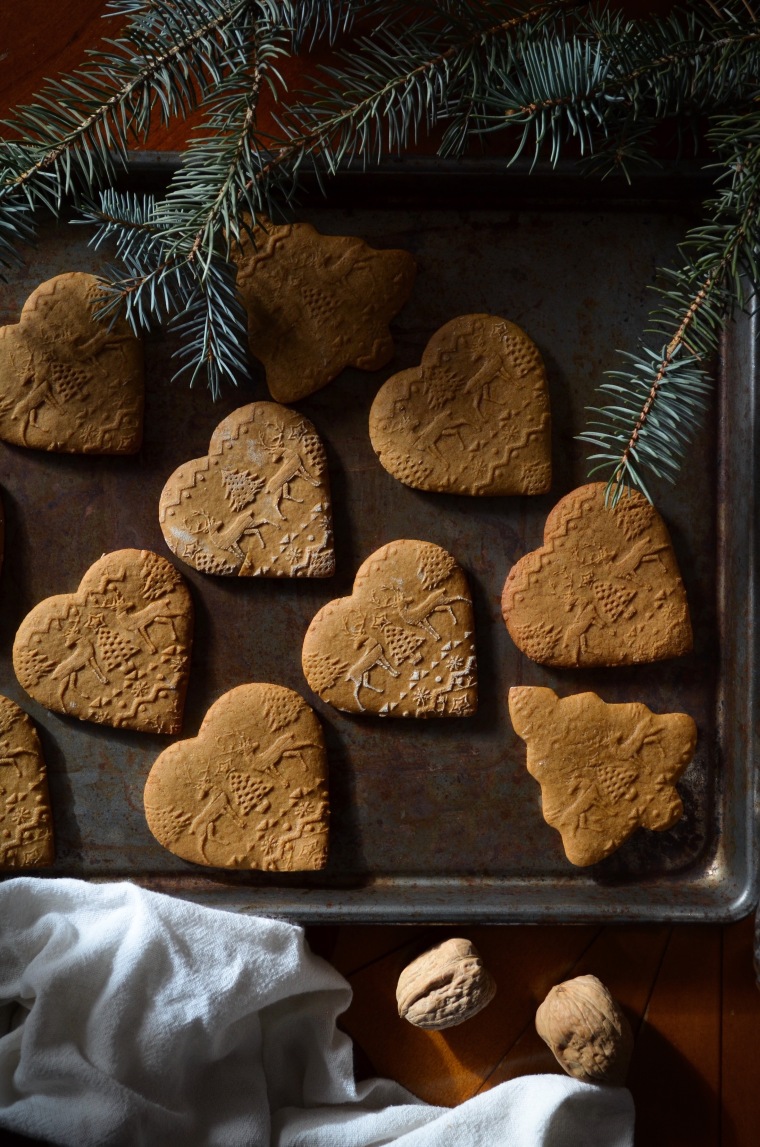
Bake the cookies, one pan at a time, for 7 – 8 minutes until the edges of the cookies just begin to darken slightly. Remove from the oven and let the cookies cool slightly before transferring to a cooling rack to cool completely. Store in an airtight container. The cookies will harden as they set.
*A note on baking: We live at an elevation of over 6000 feet (1830 m). This recipe works very well at high altitude, but I haven’t tested it at lower elevations.

These almost look too pretty to eat! Almost.
LikeLiked by 2 people
Thanks, Dorothy! I love the pattern. It reminds me of those old-fashioned German Christmas pyramid decorations (not sure what they’re called) that spin when the candles are lit. So magical! Happy holidays!
LikeLiked by 2 people
Yes, they do! The cookies look magical too, like they slipped right out of a fairy tale!
LikeLiked by 2 people
You won’t believe it but I told my husband I wanted an engraved rolling pin for Christmas this year! I forwarding this article to him! Thanks for the recommendation! I’ll definitely be back for the tips. 😉
LikeLiked by 2 people
That’s great to hear! Fingers crossed you get the pin for Christmas! There are several other patterns available from Embossed at the links in the post. In addition to the reindeer, I love the snowflake pattern. Happy baking!
LikeLiked by 1 person
Oh yummy!
LikeLiked by 2 people
Thanks, Trina and Tina!
LikeLiked by 1 person
Looks yummy!
LikeLiked by 2 people
Thanks so much, Bernice!
LikeLiked by 2 people
I have good news and bad news. First the good news; these cookies are delicious. They have just the right amount of spice. The bad new is I could not get the rolling pin to work. The dough kept sticking to the pin. I floured it liberally but i5 still kept sticking. Any suggestions? All wasn’t wasted however, as I made gingerbread me. From the dough.
LikeLiked by 1 person
Hi Delilah,
So sorry to hear that the dough kept sticking! When I was testing the recipe I intentionally did not add as much flour, knowing that the dough would need to be pliable in order to hold the design – and also that I would add flour while rolling. I heavily floured both the dough and the pin. If the dough is still sticking, I’d suggest adding just a tablespoon or two of additional flour to the dough before rolling. I’m glad to hear you were still able to make the cookies, even if they didn’t have the embossing. I hope this helps. Happy Holidays!
-Rebecca
LikeLike