
I always return to traditions during the month of December. Throughout the rest of the year traditions have a reputation for being “stuffy” or “old-fashioned,” but at Christmas time, when the world seems to be moving at record pace, and not necessarily in the direction we want it to, there’s nothing more comforting than falling back into the old and familiar. Pulling out the old cookie cutters and sorting through the recipe box for those cookies we bake only once or twice a year; dusting off the boxes of decorations, digging through sheets of tissue paper to find the ornaments we packed away so carefully last year. It’s almost like a long over-due visit with dear old friends. (And when the dog accidentally knocks one of those ornaments off the tree, like she did today, and it shatters on the floor there are always tears as I sweep up the pieces.)
This season, especially, I’ve felt the need to revisit all the old traditions. Maybe it’s the political climate or the fact that everyone seems so divided these days, but it’s tradition that often seems to unite us. This is the first year that I’ve set up the Advent wreath and candles. My grandmother use to light it for us when we were kids, softly retelling the Christmas story as she lit each candle. When she moved into a care facility she gave the wreath, and it’s purple, pink and white candles, to me. I have to admit that it was forgotten and buried deep in the closet all these years. But a few weeks ago when we were going through all the decorations in the closet, I saw the box, though I couldn’t actually remember what was inside. When we folded back the lid a flood of memories washed over me. Christmas traditions have a way of immediately transporting us back to our childhoods – even the candles smell like Christmas somehow, though they are just ordinary, unscented wax. I guess that’s Christmas magic at work. I decided to set it up next to the Christmas tree.


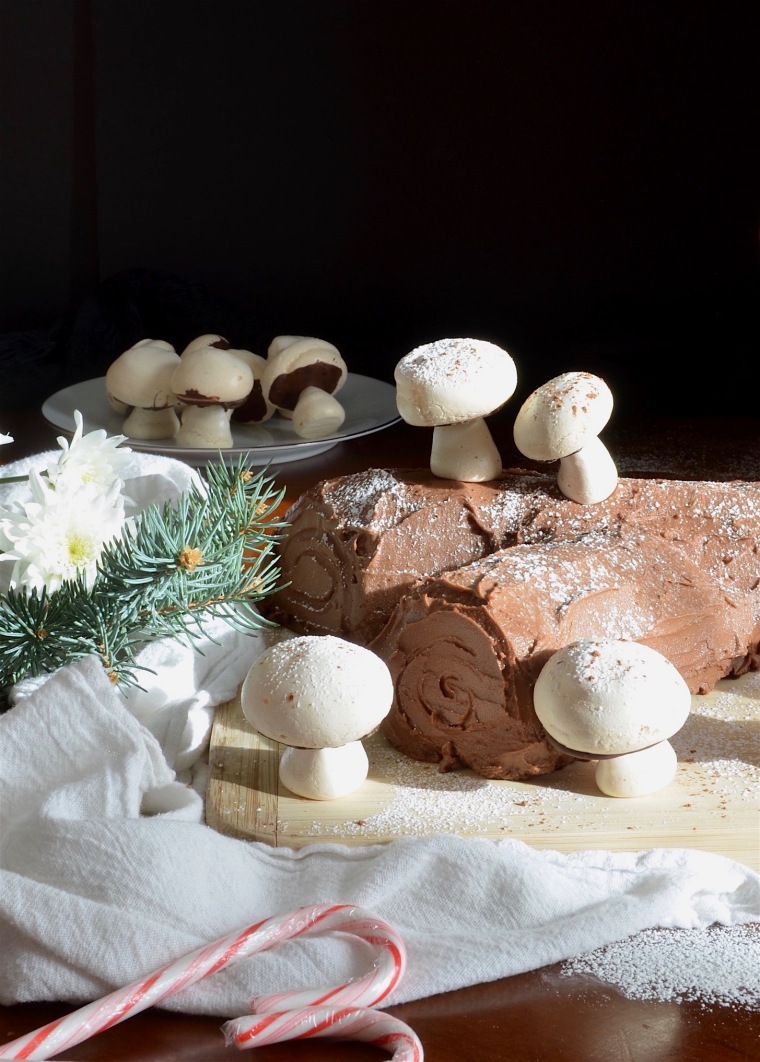
One tradition that has never been forgotten or hidden away in a box in the closet is that of the Bûche de Noël. I look forward to making it every single year. There are so many variations of this Christmastime cake and I’ve tried several versions, but this is my favourite. It starts with a decadent, flourless dark chocolate sponge cake that’s filled with sweetened cream cheese and frosted with a rich chocolate frosting. As kids we used to decorate the cake with little porcelain forest animals like deer and rabbits. I sometimes wonder what ever happened to those little creatures. Perhaps they were also tucked away in a box in a closet and forgotten, though more likely they broke and were thrown away. Even back then they were chipped and the paint was fading, probably because all the kids would so diligently lick every last trace of frosting from their legs and antlers while waiting for our cake! I prefer to decorate the mine with whimsical little meringue mushroom cookies anyway, as they are my favorite! Sometimes I even decorate my birthday cake with them in August!

Don’t be intimidated by these little mushrooms. They are just as easy as making meringue cookies. I often enlist the kids to assemble them. The stems and caps are dusted with cocoa powder to look like they just came off the forest floor. They’re baked separately then glued together using melted chocolate, which resembles the gills on the underside of a real mushroom cap. These can be made several days in advance and stored in an airtight container.
(And just a note on the photos in this post: I took the pictures of the cake on Christmas Eve of last year for a blog post on my other blog that was never actually written. I’m so glad they finally found a place to live here. )
Happy Holidays!!
Bûche de Noël
Traditional Holiday Yule Log
for the cake:
6 eggs separated
3/4 cup sugar
1/2 cup cocoa powder
1 tsp vanilla extract
for the filling:
8 oz. cream cheese, softened
2 oz. butter, softened
2 cups powdered sugar
1 tsp vanilla
for the frosting:
1 stick of butter, very soft
2/3 cup cocoa power
3 cups powdered sugar
1/3 cup milk
1 tsp vanilla
To make the cake:
Preheat the oven to 350 F (180C). Line a jelly roll pan with parchment paper.
Separate the eggs into two large bowls. Whip the whites until thick peaks form. Set aside.
Whisk the yolks with the sugar and vanilla in another bowl until thick and pale. Sift in the cocoa powder and stir until combined. Add a dollop of the whites and stir in vigorously to lighten the mixture. Then gently fold in the remaining whites.
Spread the batter evenly in the prepared pan. Bake for 20 minutes. Remove and allow to cool completely on the parchment before filling.
To make the filling:
Beat the cream cheese and butter together until smooth and creamy. Gradually beat in the powdered sugar and vanilla.
Using the parchment paper, lift the cake out of the pan and place on a flat surface. Spread the filling over the cooled cake.
Begin rolling the cake from the long end (lengthwise), pulling the parchment paper away as you go. Place the seam on the bottom. Cut the excess cake from both ends. Cut the cake at a 45 degree angle about one-third of the way down. Place the cut edge of the smaller piece against the larger log to resemble a branch.
To make the chocolate frosting:
Beat the butter and cocoa powder together until smooth. Add half the milk and half the powdered sugar. Beat until smooth, then repeat with the remaining milk and powdered sugar. Beat in the vanilla.
Assemble the cake on the serving dish. I like to serve this on a simple wooden board. Slide a few small pieces of parchment paper under the edges of the cake. (These are easily removable and prevent your board from getting frosting on it.) Frost the cake using the frosting to secure the “branch” to the log. Finish by creating a few strokes in the icing following the length of the log to resemble bark. Create a spiral design on the cut edges of the cake to resemble the tree rings. Refrigerate until the frosting is firm, then cover with plastic wrap and refrigerate until ready to serve.
This can be made a day or two in advance. Just before serving decorate with the meringue mushrooms and dust with cocoa powder and powdered sugar.
Meringue Mushroom Cookies
3 egg whites
1/4 tsp cream of tarter
1/4 tsp vanilla extract
a pinch of salt
3/4 cup fine sugar
cocoa powder for dusting
1/2 cup chocolate chips
Line two sheet pans with parchment paper. Preheat your oven to 250 F (120 C).
In a large bowl with an electric mixer, beat the egg whites, cream of tarter, salt and vanilla until soft peaks form. While the mixer is running, slowly adding in the sugar, one tablespoon at a time. Beat until the peaks are firm and glossy.
Place the meringue in a pastry bag fitted with a round tip – or alternately, snip the corner off of a gallon size zip-top bag and place the meringue inside.
Pipe the mushroom caps onto one of the parchment lined sheets by holding the piping bag slightly above the sheet and piping the meringue into a round cap shape. Pull the bag away to the side. If there is a tip on the top of your cap, gently press it down with a wet finger.
On the other baking sheet, make the stems by placing the bag directly on the sheet pan and piping out a disk of the meringue. Then pull the bag straight up to make a Hershey kiss-type shape.
Lightly sprinkle the caps and stems with cocoa powder and use a folder or a folded newspaper to gently fan off the excess.
Place the sheets in a preheated oven and bake for 1 hour. Turn the oven off and crack the door, but leave the meringues inside for another 15 minutes to cool.
Remove from oven and cool completely.
Melt the chocolate in a bain-marie double boiler or in the microwave. With a toothpick, gently hollow out a hole in the bottom of one of the mushroom caps. Spread the bottom with melted chocolate, being sure to fill in the hole. Place the tip of a stem in the hole and place the mushroom upside-down or on its side to allow the chocolate to solidify completely. If you’re very artistic, you can use the toothpick to draw lines in the chocolate from the stem to the egde of the cap as the chocolate solidifies, or you can just let them cool as they are. Store in an airtight container.

Beautiful! You’re so talented!
LikeLiked by 1 person
Thank you, Mimi! They are really so easy and fun to make! Happy holidays to you and your family!
LikeLiked by 1 person
Your meringue mushrooms look amazing.
LikeLike
Thank you so much, Cathryn! Wishing you a very happy holiday!
LikeLike
Came across your blog today, Just beautiful pictures, Look forward to reading more of your blogs.
LikeLike
Thank you so much for visiting! 🙂
LikeLike